
Installation Guide
JITBackup for Google Workspace is distributed as a native Windows installer and a Linux archive for x64 and ARM64 systems. Select the package that matches the operating system's native CPU architecture.
System Requirements
Before you begin, make sure the target server meets the following requirements:
- Operating system: Windows x64, Windows ARM64, Linux x64 / AMD64, or Linux ARM64 / AArch64.
- Privileges: Administrator access on Windows or
rootaccess throughsudoon Linux. - Linux automatic installation:
curl,tar, and an active internet connection. - Browser: A current browser with JavaScript and cookies enabled for the management console.
- Storage: Separate locations for the local index and backup data are recommended.
- Backup destinations: Local disks, Windows network shares, S3-compatible object storage, Microsoft Azure Storage, or Google Cloud Storage.
Windows Installation
Windows x64 and Windows ARM installers are separate. The installer checks the native Windows architecture before making changes and exits if the package does not match the computer.
- Visit the JITBackup download page.
- Select Windows x64 or Windows ARM according to the native architecture of the computer.
- Download and run the corresponding
.exeinstaller as an administrator. - On the port configuration page, enter the management console port. The default is
2000; valid values are1through65535.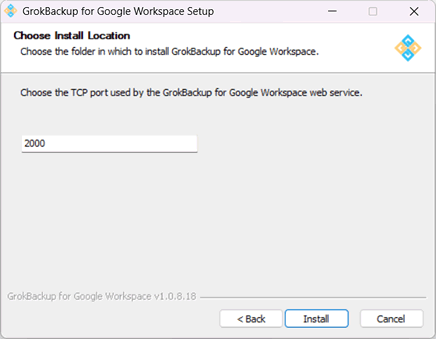
- Complete the installation. The JITBackup service is configured to start automatically and is started immediately.
The default installation directory is:
C:\Program Files\JitBackup for Google Workspace\
The installed Windows Service uses the internal name JitBackup and the display name JitBackup for Google Workspace.
Linux Installation
The Linux installer deploys JITBackup to /opt/jitbackup, installs /etc/systemd/system/jitbackup.service, enables the service at startup, and then starts or restarts it.
Automatic Installation
The installation script automatically detects your architecture, downloads the matching package, and configures the service.
- Open your Linux terminal.
- Ensure you have
rootprivileges and that curl is installed. - Run:
curl -s https://www.jitbackup.com/jitbackup.sh | sudo bash
During installation, enter the management console port when prompted. Press Enter to accept the default port 2000; valid values are 1 through 65535.
Manual Download and Installation
Use manual installation when preparing an offline server or when you want to inspect and transfer the package yourself.
- Visit the JITBackup download page.
- Download the Linux x64 or Linux ARM
.tar.gzarchive that matches the server architecture. - Transfer the archive to the server.
- Extract the archive and run its installer:
tar -xzf jitbackup_<version>_x64_<timestamp>.tar.gz
sudo ./install.sh
Refer to the Automatic Installation section above for details, and note that reinstalling won't overwrite your current settings.
Verify the Linux Service
Start or stop the service:
sudo systemctl start jitbackup.service
sudo systemctl stop jitbackup.service
Check the service state:
systemctl status jitbackup.service
View service logs:
journalctl -u jitbackup.service
Management Console
After the service starts, open http://localhost:2000 in a browser. Replace 2000 with the port selected during installation.
By default, the installer automatically opens the selected management console port in the host firewall. When connecting from another computer, replace localhost with the server's host name or IP address. If the server is behind an external firewall, router, or cloud security group, allow the same port there as well.